
In this article, you’ll learn how to submit an item for sale on eBay. There’s a lot to cover. We’re going to discuss how to create your photographs, how you can list items, how much eBay charges, how to enter information and pictures for your listing items, specify payment and shipping, and so on eBay.
This article is not intended as a quick step-through process. We’ll show you the process step-by-step, but we’ll stop and explain various concepts and issues in detail as we go. So, we advise you to read through this once before listing your first item; otherwise, eBay may timeout and make you start again.
Creating Your Photographs
You’ll need photos of the products you’re selling; you can try to sell without pictures, but you’ll regret it—in general, they’re unlikely to sell well. You can get product photographs from a supplier; in many other cases, you’ll have to get the photos yourself. That’s not necessarily difficult.
You don’t need the very best digital camera for your pictures. Digital photography has advanced tremendously over the last few years, which means the top-end equipment is amazing . . . but it also means that good equipment, good enough for taking pictures to post on a web page, is cheap.
The basic requirements are pretty simple:
- 2.0 megapixels Get a camera that produces images with 2 megapixels or more.
- Optical zoom Optical zoom is more important than digital zoom.
- Macro mode Macro, or close-up, mode, lets you take photographs very close to the object, allowing you to get fine details.
- Optical viewfinder You need a camera with an optical viewfinder (a glass viewer you look through, like on a film camera).
- Manual flash You should be able to control the moment to determine when the flash is used and when it isn’t.
- Well-known brand Picking a famous brand with a good reputation ensures you’ll get something decent.
Taking Great Photographs
Here are a few tips for taking great photos:
- Lighting Poorly lit products are going to look bad. Just hitting the item with a flash isn’t good enough, as it often creates reflections, high spots, and dark spots. You might try outside light. Bright but cloudy days are usually good because the light is more diffuse; you don’t want heavy shadows. Getting lighting just right is very tricky for amateur photographers. There’s a great little tool that might help, though. Take a look at the Cloud Dome and Cloud Cube (CloudDome). You place the object into the dome or tent, shine lights on the outside, and snap the picture through a porthole. You’ll get diffuse, even light.
- Focus Make sure your pictures are in focus. Use a tripod to keep your camera still while you snap.
- Background Remove the clutter! Before you snap, look at the object and the experience. Cluttered environments are both distracting and look amateurish.
- Plenty of shots. The great thing about digital “film” is that it’s cheap. Take plenty of pictures: you want to ensure you get some good ones and provide several images to your potential buyers.
The Selling Process
Once you’ve sold a few times, it will become natural. But there are some steps in the entire process you need to understand. When you want to list an item on eBay, you’re going to have to do the following:
- Choose a selling format.
- Select a listing category.
- Create a title and description.
- Enter pricing information.
- Specify when the item will sell.
- Specify item quantity and location.
- Add one or more photographs.
- Selecting the listing layout and options.
- Provide payment, shipping, and returns details.
- Review and submit the listing.
We’ll look at this one by one.
There’s a way to test the process that we recommend you use. When you list an item, place it into a Test category, so you can view it and experiment with it. You must label the item as a test in both the Title and Description fields. Do not test by putting an item into a live category; when you do so, you are committing to deliver the item, and if you don’t, you could be penalized. Also, do not use a live account to leave or receive feedback; you must use a test account.
Choosing a Selling Format
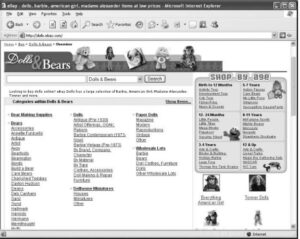
EBay built a categorization system to bring some semblance of order to the hundreds of millions of items sold through eBay every year. You can easily see this by going to the eBay home page and clicking on a product category—say, Dolls & Bears. On the page that appears, you’ll find subcategories of different kinds. In some cases, there’s a third, fourth, or fifth level of categorization, too.
The first step in listing a product is selecting a category, or perhaps two, in which you want to list the products. Here’s how:
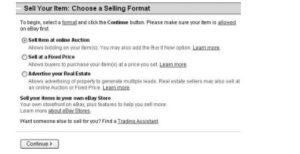
- Click the Sell button on the button bar at the top of the eBay screen.
- On the following page, click the Sell Your Item button. You’ll be taken to a page with your Selling Format options.
- You have up to four options here. We’re going to assume that you are selecting either Sell the item at an online Auction (you’ll be able to choose to Buy It Now later) or Sell at a Fixed Price, then click the Continue button to see the Select Category page.
Selecting a Listing Category
The next step is to select the category into which you want to place your item.
Listing in two categories ensures that the product is more likely to sell, but in many cases it probably isn’t worthwhile unless the category is a major one for your product type. Experiment to see if this works for you.
1. You may want to search using your product name; enter it into the text box in the top right and click the Search button. eBay searches for matching products, open another window, and shows you where these items have been listed. If you find two really strong categories, as in the screen displayed, you may decide to list the item in both; otherwise, in most cases, you’ll want to list it in one. (Listing in two categories increases your fees. You’ll pay two insertion fees, and some of the optional prices are doubled, too—most upgrade fees will be doubled, such as the fee for bolding text. Click the fee varies link to see details.)
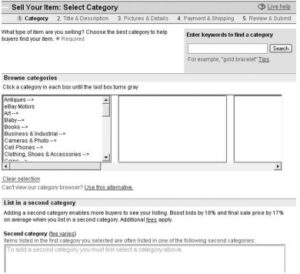
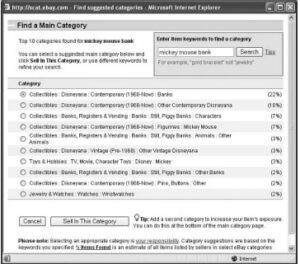
2. Select a category into which you want to place the item, and click Sell In This Category button. The other way to select a class is to click on the first list box in the main window, which then displays subcategories in the box to the right, from which you can select.
3. If you decide to place the item in a second category, click the Select from all sorts. . . link under the Second category box. When you’ve finished, click the Continue button to move on to the Describe Your Item page.
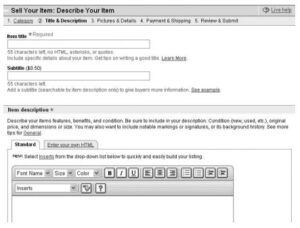
Creating a Title and Description
The next step is to enter your title and description.
- Enter an Item title of up to 55 characters.
- Enter a Subtitle if you wish, though you’ll pay an extra 50 cents ($1 if you use two categories).
- Enter your Item description using the built-in editor or the HTML box.
- Notice the Inserts drop-down list box. This allows you to create blocks of text that you’ll use again. Select Create an Insert . . . and another little window opens. Enter a title, the union of text, and click the Save button. You can now select the insert from the Inserts drop-down list box in this (and later) listings.
- Check your listing; click the Preview description link under the description box.
- Click the Continue button to move to the next screen.
Let’s consider a few ways to make your listing sell. First, consider these issues when creating a Title.
- You’ve got 55 characters to work with; use as many as possible.
- Get as many keywords into your title as possible to help people find your products and “sell”—you need to think about what terms people are likely to use when searching.
- Get specific product characteristics and brand names into your title. Don’t just say Canon Digital Camera. Say Canon PowerShot SD110 3MP Digital Elph w/ 2xOpticalZoom.
- Include the generic term, too. Some people will search for the Canon PowerShot, and others will search for Digital Camera.
- Put strong words in the title, leaving more expansive details for the description.
- Avoid descriptive terms people aren’t searching for—Great condition, cool, fantastic deal, and so on.
- Remember, the title will appear on listing pages, not just your product page; you must have enough information in the title to draw people into the listing page.
If you wish, you can add a subtitle, a second line that appears in the listing and on the listing page, and at the top of your product page. Many merchants who sell expensive equipment do this. It’s only another 50 cents—but it may not make much difference for lower-cost products or products with little competition.
How about the product description?
- The more detail, the better. Make it easy for someone to make a decision.
- Add the descriptive text in the title you didn’t have space for. Now’s the time to talk about the great condition of the product, how well it’s been looked after, the warranty, and so on.
- Discuss shipping and payment information.
- Don’t make the customer wonder. Provide answers to their questions before they have to ask.
You can type directly into the box and use the basic formatting tools. More advanced merchants often use the HTML box; they create their descriptions in an HTML program and then paste them into the box. This allows them more flexibility over the report. Using HTML, you could, for instance, create a feature table.
Entering Pricing Information
When you move to the next page, eBay tries to load a little image-upload program; although we’ll be looking at pricing information first, then timing, the page also includes a photograph upload area.
Allow eBay to load this. If you’re using Internet Explorer, it may initially block the download; you’ll see a yellow bar at the top of the page. Click on the bar, select Install ActiveX to continue, and then click the Run button in the open dialogue box. Once the program has been installed, you’ll see a page with the Pricing information shown in Figure (if you selected an auction) or (if you are listing a fixed-price item).
Here’s how to set Auction Pricing
- Enter a Starting price. You must have this Number. Remember that the lower the price, you’re likely to get bidding.
- If you wish, enter a Reserve price, the minimum price for which the product must sell. The product is not sold if the bidding doesn’t reach this high. Remember, you’ll be charged a fee for a reserve price, although it will be refunded if the item sells.
- You may also enter a Buy It Now price. As soon as someone buys it at the Buy It Now price, the auction ends unless bidding begins and, if applicable, passes the reserve price, at which point the Buy It Now option is removed.
Specifying Item Quantity and Location
Next, you’ll specify how many items you sell and where they are lower down on the same page.
- If you have multiple items that you are willing to sell separately to different people, enter the Number into the Quantity box.
- If you have multiple items that you want to sell to a single person, as a “Lot,” leave 1 in the Quantity box, click the Lots link, and enter the number of items into the Number of items per lot box that appears. (If you have a box with 20 books in it, enter 20.)
- If you have multiple lots—such as five boxes of books, with 20 books in each package— enter the Number of lots into the Quantity box and the number of books in each box into the Number of items per lot.
Finally, enter the Item location information. Click the Change link, and you can enter a ZIP code; also, choose whether to let eBay enter the city and state into your product page based on the ZIP or whether you want to join a location.
The address information is particularly important for very large or unwieldy items— the sort of item people will probably only want to buy locally—because this allows people in your area to find the product listing.
Hosting Your Pictures
If you have hosted pictures elsewhere, you can point to one of them to be used in your listing. Where do you place these images? On your website, or perhaps in a personal hosting is provided by your ISP. There are also image-hosting services, such as Pongo, Twaze, and PixHost. You can specify a single image on this page, which will be used as your primary picture—the picture that will appear at the top of your product page and in your listing in a category or search-results page if you choose the Gallery feature later.
- Click the Your Web hosting link, and you’ll see the information.
- Enter the URL to the picture into the Picture Web address (Free) text box.
- If you entered a URL into your description, you could click The report already includes a picture URL for my item check box, and eBay will use that URL; there’s no need to enter anything into the Picture Web address (Free) text box.
- If you want the Picture Show feature (it costs 25 cents), click the check box, and several more text boxes appear into which you can enter URLs. The Picture Show feature puts an animated picture display at the top of your product page.
Specifying the Listing Layout and Options
Next, you can specify your listing layout and options. Scroll down the page a little further. These are the options you’ll find in this area:
| Listing designer | For ten cents you can select a theme—colors and border styles—and a layout, which defines where the pictures sit in relation to the text. Use the Preview listing link to see what it will look like. |
|---|---|
| Increase your item’s visibility | In this area you can select a variety of options related to how and what will be displayed. |
| Remember my selections | Check this, and eBay will save your selections for subsequent listings. |
| Preview your listing in search results | This area shows you what buyers will see in the search results or when they are browsing categories. As you make selections below, this area changes to show you the effect. |
| Gallery | Select this and your picture will appear next to your product title in the search results. |
| Subtitle | Here’s another chance to enter a subtitle to appear under your title. |
| Bold | Add bold text to the item title. |
| Border | Place a frame around your listing. |
| Highlight | Put a colored background behind your information in the search results. |
| Show as a gift | Puts a little gift-box icon in your listing. Plus, information about gift wrapping, express shipping, and shipping to the gift recipient will be added to the product description. |
| Gallery Featured | Adds the standard Gallery feature, and the listing will sometimes appear above the main listings, in the Featured area. |
| Featured Plus | This adds your listing to the Featured area, though without a picture. |
| Home Page Featured | Select this and your product may appear on the eBay home page. |
| Page Counter | Click the Change link to see page-counter options. A page counter shows how many people have viewed your page. Probably not a great idea, as it may sometimes indicate to someone that few people are viewing your pages and lead people to hold off bidding until later. You can, however, add a hidden counter; you can see the results, buyers can’t. |
Reviewing and Submitting Your Listing
This is the final step; you can review your submission on the next page. We suggest you look through this carefully; it shows exactly what will be in the listing and under what conditions it will be run. You can edit anything from this page if you find a mistake. Look carefully at the fees to ensure you know what you’re being charged for the insertion, then click Submit Listing, and you’ve finished.
Now you can sit back and wait. Don’t expect to see people bidding immediately; many hold off until the last moment. So don’t be discouraged if you don’t see any action until the previous day. In the meantime, read on to learn how to monitor, modify, and manage your listings.
Q: “Does eBay report member sales or earnings to the IRS?”
A: No, not yet. At the moment, eBay has stated that if they receive a demand for information. They will honor it (as will PayPal), but no such subpoena has ever been issued to my knowledge. On its website, the IRS provides an interesting discussion of this topic (go to the home page and type "online auction" into the site's search engine).
Whether or not it is reported to the IRS by another party, if you have gain or profit from selling on eBay, you are obligated to record it as income and pay income taxes on it. The IRS has prepared a new version of Form 1099-MISC.
And wants to require eBay to give it to you if you have more than one hundred sales or more than $5,000 in auction bids during the calendar year when this book goes to press. This could change by the time this book is published. For more up-to-date informatio. See your accountant or tax consultant, or visit the IRS website.


One Comment