Orient the Greenhouse Toward the Sun
This is where solar greenhouse design begins: the sun. A major tenet behind all principles in this book is managing solar energy heat and light to create a naturally controlled year-round growing environment. To maximize light year-round, and particularly in the winter, the majority of the greenhouse glazing (light-transmitting materials) should face the direction of the sun: the south if in the Northern Hemisphere.
Fact: On average, on a clear sunny day in North America, 85%–90% of solar radiation comes from the south; less than 15% is diffuse light coming from other directions.
This fact provides the reasoning behind two principal features of solar greenhouses: south-facing glazing and an insulated north wall. By using glazing on the south side of the structure, you maximize the effectiveness of the glazing area.
In contrast, surfaces facing north play a minor role in the light collection during the day. If they are glazed, there is little benefit from a growing or heating perspective. Plus, the sacrifice of doing so is huge— it dramatically reduces the heat loss of the structure, causing the characteristic cold temperatures of traditional greenhouses.
Why are many commercial greenhouses oriented facing east/west?
Large commercial greenhouses are often gutter-connected structures, which involve several units connected by ridges. If a gutter-connected greenhouse faces south, the thick ridge beams in between structures create shadows on the floor. The shadows move very little throughout the day, creating slower plant growth in that small area. Thus, even though it is a sacrifice for energy efficiency, the commercial industry often recommends facing the long axis of the greenhouse east/west to get a uniform crop in a tightly competitive industry. But for potential solar greenhouses builders, this recommendation has little relevance; it shouldn’t be followed for energy-efficient structures.
Choosing Dimensions
To increase solar gain in the greenhouse, your goal is to maximize the area of south-facing glazing— while maintaining reasonable dimensions that fit your site.
You may read that solar greenhouses should be twice as long as wide. This refers to the aspect ratio: the ratio of length to width, as demonstrated in Fig. 2. While not a hard-and-fast rule, the reasoning behind it is sound: by elongating the structure, you can increase the area of south-facing glazing (the heat collector) relative to the footprint. For this reason, solar greenhouses usually have long rectangular shapes, with the long, glazed side facing south. That means the ridge of the greenhouse runs along the east-west axis, a common way to describe a greenhouse’s orientation.
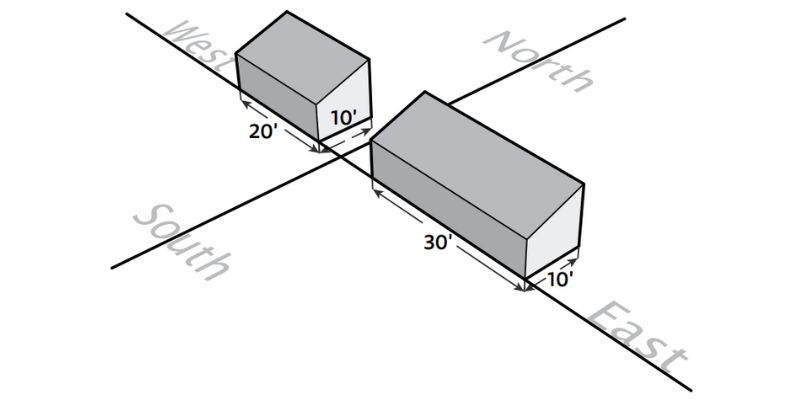
Figure 2 shows aspect ratios of 2:1 and 3:1, length: width. We recommend something in this range, depending on what your site allows. Again, keep in mind practical considerations like your site, possible obstructions, and maneuverability inside. Larger, commercial greenhouses often have to be wider to accommodate a larger footprint and maintain an easily manageable space.
When it comes to the height of the greenhouse, consider local building codes, which often stipulate a maximum height for buildings. Residential greenhouses are typically in the range of 8’–11′ at their peak. Commercial greenhouses with larger footprints necessitate taller walls, as do larger structures growing tall crops like fruit trees. (Some growers go as high as 17′ to accommodate trees. This can stick out in a backyard, though. Our residential greenhouses are typically 9’–10′ on the north wall.)
Climate Considerations
Consider your regional climate conditions and local weather patterns when choosing an orientation. For example, many areas of the East Coast of the US have clear mornings that turn to cloudy afternoons— a reason to favor a southeast orientation over directly south. Other coastal areas have cloudy mornings that burn off into clear afternoons, so tilting the greenhouse more toward the afternoon light would be best, as long as your area isn’t too hot.
What If the Greenhouse Can’t Face Directly South?
Not all locations have an open southern orientation, clear of obstructions. Often, a tree or a structure will shade part of the greenhouse, forcing you to shift the greenhouse away from the south. The precise effect varies by location, but we generally find that shifting the greenhouse up to 45 degrees away from the south— that is, southeast or southwest— does not have a significant impact on total light collection. Across many different locations, energy models of greenhouses show that a shift of up to about 45 degrees in either direction allows greenhouses to still receive over 90% of the light they would get with a south orientation. However, the light starts to attenuate if you shift further east or west. In Boulder, Colorado, for example, a greenhouse oriented 67.5 degrees toward the west (so facing predominantly west) only gets 70% of the annual light compared to a due-south orientation. Orienting the greenhouse any further than this dramatically reduces light levels, particularly in the winter. (The exact variation depends on your latitude and climate.) Thus, we recommend anything within 45 degrees of due south, with a preference toward southeast orientations.
Orienting the greenhouse more southeast allows for more light in the morning, which has several benefits. Morning light is considered softer or less intense than afternoon light because it lacks the intense heat characteristic of the afternoon sun. Moreover, in the morning the greenhouse is cool, having just gone through the coldest part of the night (just before dawn). Morning light allows the greenhouse to warm up faster, reducing stress on plants.
In contrast, facing the greenhouse southwest brings in much more heat in the afternoon, after the greenhouse has already been heating up all day. It risks overheating the greenhouse or scorching plants in front of the west windows. For these reasons, most growers prefer a southeastern orientation to take advantage of the light and heat in the morning, particularly those located in warm climates. (Note that these factors also inform door/window placement. We rarely place doors on the east side of the greenhouse to allow for a larger window area there. Rather, doors can be conveniently placed on the west or north walls.)
Tools for Orienting the Greenhouse
A compass is needed to identify due south at your site. This being 2016, there are free apps for smartphones that perform this task.
An extra step for precise growers is to use a magnetic field calculator like the one available from NOAA (ngdc.noaa.gov/geomag-web) to find the variation between true south and what a compass will read. Called magnetic declination, there is a slight variation between the two due to the earth’s magnetic field— though it’s only a few degrees.
Siting the Greenhouse
The goal for siting the greenhouse is the same as for orientation: ensuring good light year-round, and maximizing light during the colder months. Light access at a potential greenhouse site is determined by macro factors (the path of the sun at your latitude) and site-specific factors, like shading from trees
The Solar Path
To evaluate a site for a greenhouse, you need to know a bit about where the sun will be and when. The sun’s path through the sky is constantly changing over the year. Fortunately, though, it is predictable. The sun’s position is determined by two coordinates: the elevation and the azimuth.
- The angle of elevation (or altitude) describes how high the sun is in the sky from the ground plane. It changes from low in the winter to high in the summer, as shown in Fig. 4. This seasonal variation becomes more pronounced the further you are from the equator. We’ll reference this angle extensively throughout the book, so it is helpful to jot down some key elevation angles for your location. Some quick rules of thumb: At solar noon on the equinoxes (spring and fall), the angle of the sun is equal to 90 minus the local latitude. For example, Denver is at a latitude of 40 degrees. The solar altitude at noon on the equinoxes is 50 degrees (90 − 40). At the winter solstice (December 21), the solar elevation is 23.5 degrees less than the equinox (= 26.5 degrees for Denver). On the summer solstice ( June 21) it will be 23.5 degrees greater than on the equinox (= 73.5 degrees for Denver). Online tools are also available (see below).

- Azimuthal angle is a fancy term for the angle of the sun on the horizon, relative to due north. Importantly, it indicates the position of the sunrise and sunset each day; so it changes from a very wide arc in the summer (resulting in long days) to a narrow arc in the winter (creating short winter days) as shown in Fig. 4.
Resources for Determining the Solar Path
The website SunCalc.net gives a visual representation of the solar elevation and azimuth overlaid on a Google map; however, it only shows one date at a time. You’ll have to scroll through to get a full sense of the year. Other organizations, like the University of Oregon’s Solar Radiation Monitoring Laboratory, offer software tools to create sun path diagrams. There are also apps, like Sun Surveyor, Sun Seeker, and Helios Sun Position Calculator (available for iPhones and Androids), that have a lot of perks that most websites don’t have, but that cost $10–$30. We have not found a single outstanding visual tool that shows the solar path; you may have to use multiple tools to get a full understanding.
Together, these two angles create the solar path— the path the sun will take every day over the year. A plot of that path is called a solar path diagram, which you can look up for your location using several online tools, described below. Whatever method you choose, it’s essential to have a basic understanding of how the sun’s path changes, from a narrow arc and low elevation in the winter to a wide arc and high elevation in the summer. This movement forms the basis for many decisions in the greenhouse design process.
Evaluating Shadows
Now that you have a grasp of how the sun will move at your location, you can get more site-specific. Obstructions like neighboring buildings and trees can block critical winter light.
There are a few ways to evaluate shadows at your site. On the very simple end, observing shadows can suffice for residential growers. Many backyard growers already have an intuitive understanding of light and shadows at their site. Be sure to observe these during the coldest months, when light is most critical.
A second step is to create a bird’s eye view sketch of the site, plotting the location of obstructions relative to the greenhouse site, as shown in Fig 4. Then, add the angles of the sunrise and sunset for some key dates, such as the winter and summer solstice. This way, you can see whether the obstruction is in the “view window” of the greenhouse during the times of the year when light is needed. If it is, you can go on to calculate the obstruction’s length and impact on the greenhouse at different times of the year.
There are a couple of ways to determine whether, or when, an obstruction will shade your greenhouse site. The math-centric approach is to use hand measurements and calculations. The basic process is to go out to your site, determine the height of nearby obstructions using an elevation gauge, and then use trigonometry to determine the length of the shadow at different times of the year based on the elevation angle of the sun. Online calculators and guides can also help.
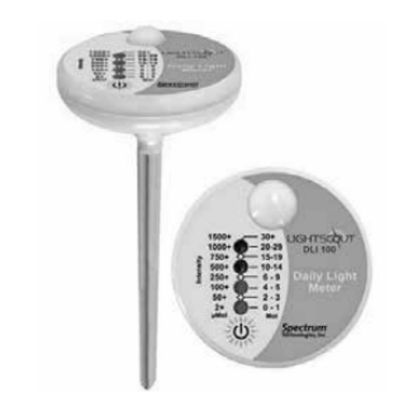
Another strategy is to measure the available light at the site, rather than shadows. This comes with the challenge that light levels change dramatically daily and seasonally, so it is hard to get a full picture. Light meters, such as the Light Scout DLI 100 shown in Figure 5, record light levels over a day. To get a full sense of light conditions, you will need to record many days. These are especially useful for comparing two different sites, as long as readings are taken on days with similar conditions. Simply move the meter to different sites to see which has greater light, or use two meters to compare two potential sites simultaneously. More on light meters in “Tools for Siting the Greenhouse.”
While the goal is to reduce shading in the greenhouse in the winter, summer shadows can benefit the greenhouse. Depending on your climate, it’s likely that there will be plentiful light for growth after the last frost date. In the summer months, light and heat in a greenhouse can get excessive and overheat the greenhouse. At these times of the year, some shading is often beneficial. The best shading obstructions are deciduous trees that drop their leaves in the winter, providing light when you need it, but shading when you don’t. A tree on the west side of the greenhouse, as shown in Fig. 5, is a natural benefactor for the greenhouse.
Other Siting Factors
Access
A good greenhouse site is also easily accessible. The more you are in the greenhouse, the easier it is to spot pest/disease problems, ensure proper watering, keep an eye on plants, and enjoy it. Thus, favor spots that give easy access, and consider creating paths or covered walkways to encourage access. Likewise, if you are planning on using electricity in the greenhouse.
Tools for Siting the Greenhouse
Light meters range from simple to advanced. Precise meters are called “quantum meters” and usually cost over $300. They measure light intensity— light at a single point in time— so you will need to take many readings to get a full idea of light levels over some time or combine this with a data logger to record many readings
over some time.
Spectrum Technologies makes a basic light meter we find very useful— at a more reasonable price for residential growers (currently $59). Called the Light Scout DLI meter, you simply stick it in the ground at the greenhouse site and come back in 24 hours to get a reading of light levels in a metric called the daily light integral, or DLI (discussed in Chapter 5). The readings are very basic— the meter only gives a few ranges— but using one can be a good first step in getting an idea of light levels.
The 3D modeling program SketchUp can be used to evaluate shadows— and much more. SketchUp allows you to make a 3D rendering of the greenhouse and surrounding objects. It then gives you the option to “geolocate” the model— the program will input the solar data for your location. Once the model is created, the “shadowing tool” allows you to instantly evaluate shadows over the year simply by moving a cursor. Unlike the other methods, you can see where shadows will fall on your greenhouse and at what times of the year.
and/or a conventional water supply (both are discussed in later chapters), consider how easy it is to access the nearest electrical panel and water hookup.
Hillsides and Sloped Sites
South-facing slopes can be excellent sites for greenhouses. As we’ll discuss more in Chapter 11, building underground increases the energy efficiency of the structure. However, it requires more time and effort for site preparation. The greenhouse has to stand up to the downward pressure of soil, necessitating retaining walls or more robust foundations. Though slightly more costly, we normally encourage building into a south-facing slope if it’s available. you can use it to show engineers, contractors, and builders the plan of your greenhouse. SketchUp is available as a free download, and, contrary to first impressions, it is relatively easy to learn (no modeling or CAD experience required) by watching tutorial videos.
Finally, an accurate but costly tool is the Solar Path Finder, a simple device commonly used by solar panel installers. It’s a glass dome on a tripod that you can easily move around to evaluate different potential sites. At each site, the dome shows the reflections of objects, indicating shadows. While accurate and simple, the device currently costs about $300, which may not be worth it for a single use to site a residential greenhouse, but it can be used for other projects like siting a solar hot water system.